I’m often asked how I create the backgrounds in my photographs of cards and other crafty projects, so I thought I’d write up a tutorial to share. (If you’re new to my blog, I have more handy photo tutorials here.)
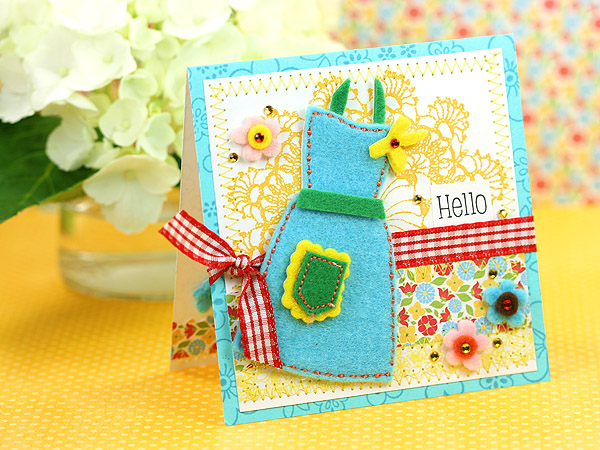
I’ll start by showing you what the finished photo looks like, so here it is!
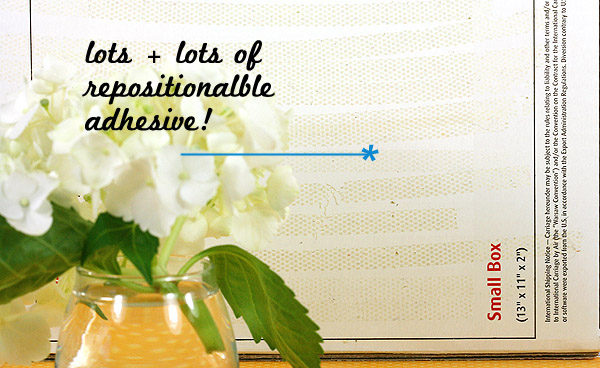
The secret to that background? It’s just a box! Here’s my setup

I used a small UPS box, but any old box that will hold your paper will do. Apply a roller type adhesive to the top and bottom parts of the box — I’ve been using the box for about 2 years now and it’s still going strong! By using a re-positionable adhesive you can easily switch out the papers. (Note: I used Kokuyo Dot ‘n’ Roller re-positionable adhesive, but it’s sadly no longer made.)
Here’s a closeup of the adhesive so you can see it better — not that I was particularly neat + tidy or anything, ha ha!
When I want to use it, I stand the box up, pushing it flat against the wall to make sure that it’s straight. Then I put the pretty paper on it, by putting the bottom edge of the paper along the table (so that it’s even) and then sticking it to the box.
Sometimes I lift the box up and add another piece of pretty paper underneath, making sure it’s lined up with the box.
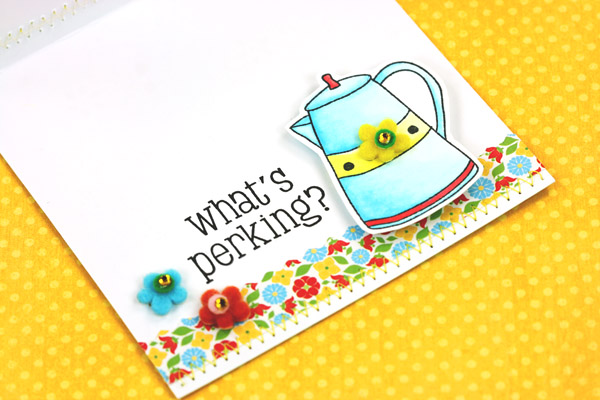
That bottom piece of paper is great for taking pictures of the insides of cards, like so
And that’s it!
(Supplies: Flower paper by GCD/Melody Ross, yellow polka dot paper by Bo Bunny, doily, coffee pot, hello and what’s perking stamps by Hero Arts. I used Copic markers to color the coffee pot. All felt goodness by Basic Grey. Ribbon from my stash.)
Do you have a setup that you like to use? I’d love to see it!
Very cool tutorial! Thanks so much for sharing this! It gave me some good ideas….
First of all…the card is fabulous, Lisa! Love the use of felt.
Thanks for the tip about the box. I love the detail of using fresh flowers. That adds such a great touch.
And I bet the pretty flowers are from your garden, yes? Alas, nothing blooming yet ’round here. LOL! Delightful card! But, please tell me you did not sew that felt apron just for this card. That it’s a pre-fab sticker. Or, I’m givin’ up right now. :p
Julie — yep, I sewed the apron. JUST KIDDING! :) It’s from Basic Grey’s Nook & Pantry line, love it! (Gonna edit the post and add her on there.)
And, the flower is from the grocery store — got her 2 weeks ago — best $1.99 deal ever!
Thanks, Lisa! I’d never have thought of that myself, I’m always propping paper up against a lamp or something (and it always falls over)!
Love your card!
Great tut, Lisa! I usually prop my background next to my TV console. Love how bright and cheery your photos are…..and such a cute card! I adore felt!
Wow! What a great show and tell! And that card is so cheery and sunny!
Love that card! it is so cute! How is your lighting set up? I have a shadow box and use work lights.
Great MOST excellent card and post! Love your sweet card…SO refreshing in colors and design! Your photo tip is super helpful!!
I was putting money on you sewing that apron! :-) You are indeed talented that way!
Your card is absolutely stunning and your tutorial is wonderful! TFS!
:-) Barbara
Such a darling apron and all the little scattered flowers!!
Thanks for the great tip. I love the cute perky card. My girlfriend would love that card, she is a coffee lover beyond belief :).
WOW! I am thoroughly impressed with your photographs! You are super professional! Superb job!!
Kelle (West Texas Designer)
Amazing… so easy. I have a L shaped thing, but it doesn’t stand up as well as this… so simple but so effective.
This card is amazing! And thanks for sharing your set-up, your photos always look like in a magazine!!
Hugs,
Vanessa
cute, short, practical post w/great photos, great idea, and super sweet card – love it! wow, you really aced the BYW homework! =) way to go!
Great card, and very useful photography tip! Thanks!
THANKS so much Lisa for these tips!!! Definitely going to use the box idea!! TRace
P.S. Your card is SO ADORABLE!!! LOVE the brightness…it makes me smile!!
I really enjoyed your tutorial and I look forward to all the others :)
Wow that’s such a great idea! Thanks for the 101!