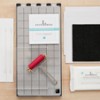
I just can’t get enough of letterpress, have one more share that I did over the weekend — how to line up your paper so that you get the same placement, every time! It’s as easy as making registration guides to put your paper in. Now, the letterpress bundle comes with some foam squares that you can use for this, but I am one of those who didn’t get the platform base insert and am making do with chipboard — and my chipboard didn’t have enough room for the foam squares.
Enter my trusty old photo corner punch! I just glued 3 photo corners together to make them thicker, then placed 3 of the stacks like so:

Note that I don’t think regular photo corners where you slip the paper into a pocket would work here as they’d leave an impression of the edge after you ran it through the machine. If you don’t have a punch you could probably make an L shape with chipboard strips and that would work too :)
And here’s another tip! After you have your paper positioned, place an un-inked letterpress plate face down where you want it to go on the card. Add adhesive to the back, then close your lid and when you lift up the plate will be stuck to the lid in position. Easy!
Just love how this card turned out, even though I got a little too much ink on the plate. Next time I’ll use less, and I’ll save room for the awesome new weather wood veneer from the thataway collection!

Hope that helps ya!
Studio Calico Letterpress Supplies
     |
Thanks for this great tip. Why didn’t I think of that:-)