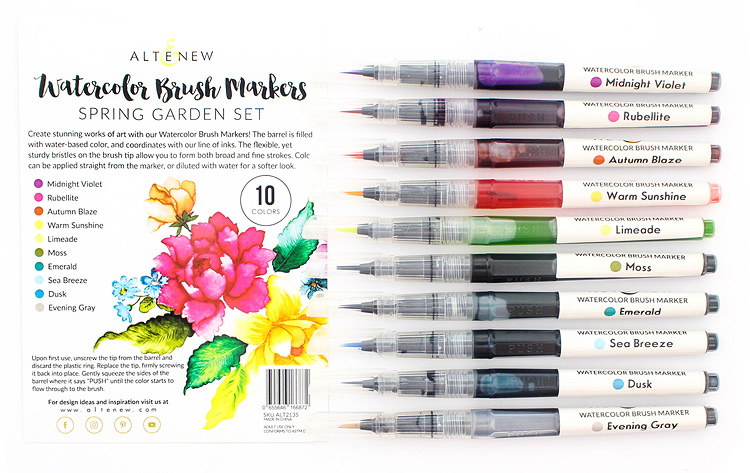
Hi there and welcome to my stop on the Altenew October release blog hop featuring the NEW watercolor brush markers!
When my sweet friend May asked me if I’d like to participate in the blog hop I said oh heck yeah! I couldn’t wait to try them out. Full disclaimer: I was sent these markers for the blog hop, however, all the opinions you’ll read here are my own.
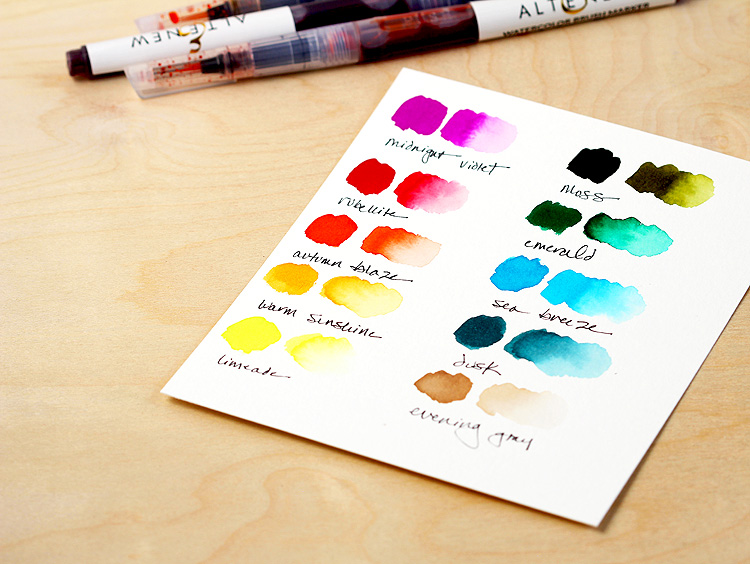
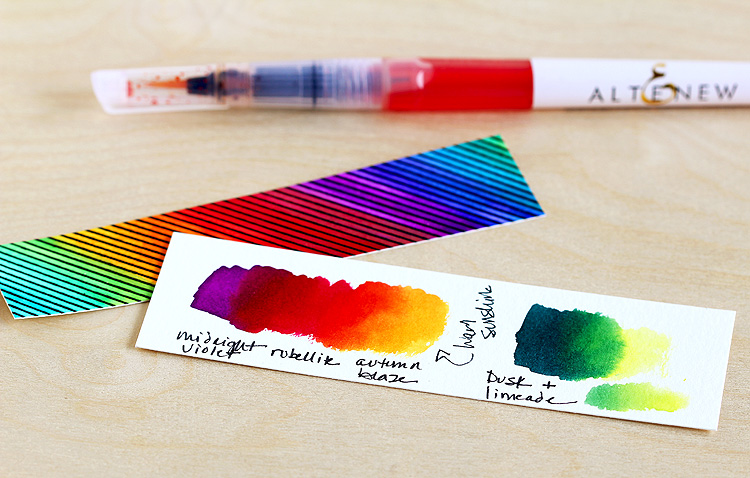
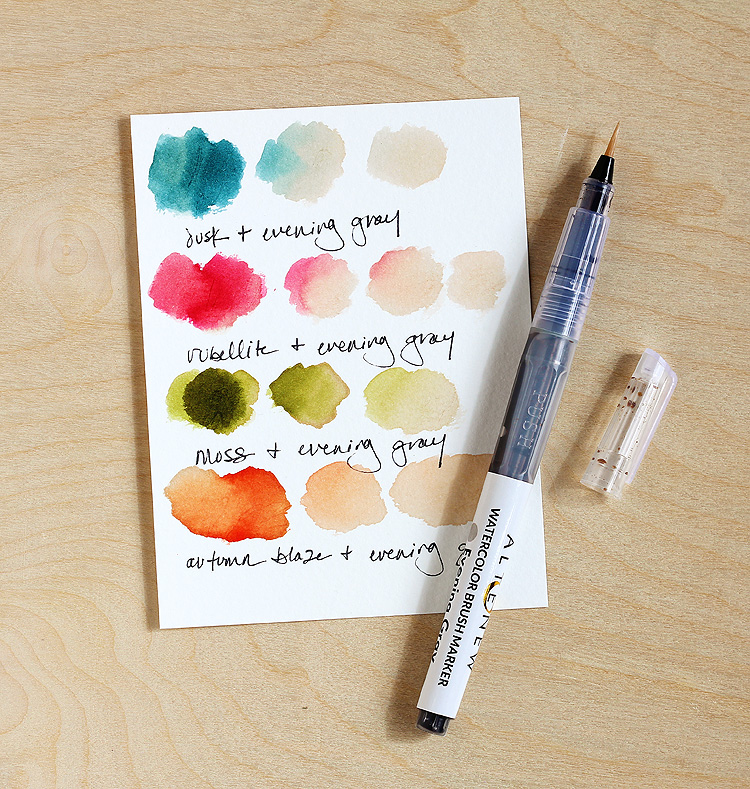
The first thing I did was to make a quick swatch chart, of course. :) I did two swatches for each color: the left swatch is straight from the marker, while the right was blended with water.
I couldn’t wait to put these markers through their paces — I kept coming up with ideas and I made SIX cards! And a VIDEO so you can see them in action. Here we go!
Hello, beautiful!
As I was making the swatches I kept saying to myself — “why helloooooo there, beautiful!” — and that inspired this card!
It’s pretty straightforward. I started off by stamping the Pinstripe stamp set with black ink on Canson XL watercolor paper and then heat embossing in clear. Then I put on some music and colored away!
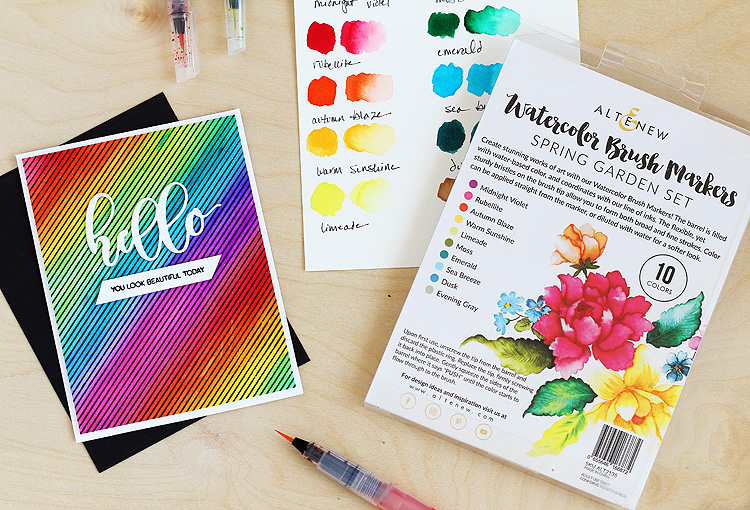
The “hello” is from the Floral Arrangement die set — I cut three of them from white cardstock and then layered them together for dimension. And that “you look beautiful today” is from the Peony Spray stamp set.
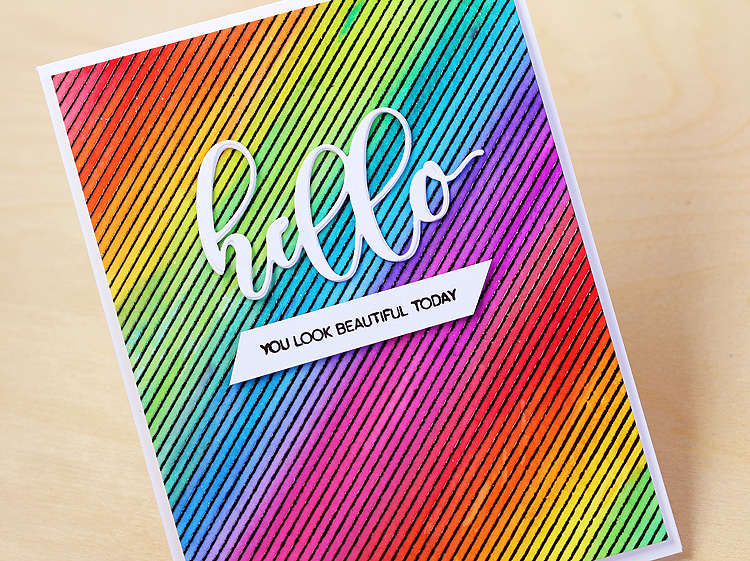
I thought about adding sequins or some bling bling but then decided nope, I’m just gonna let those marker colors shine on their own!
Tips and tricks:
- Overlap colors to blend them together and make new colors — plus it’s kinda hard to stay in the lines anyhow, especially if you’re listening to some snappy tunes!
- Make a little swatch chart to see how things will blend together. I noticed that the midnight violet and rubellite blend together to make a burgundy color which while super pretty would take away from the rainbow look I was going for, so I tried to minimize their interaction
- I put all my swatches in the case that the markers come in so that I’ll have them for future reference
I can’t wait to send this to someone!
I’ve FALLen for these Markers
Next up I decided to play with some leaves because it’s finally starting to feel a little like autumn around here, yeah! I used the With Gratitude stamp and die bundle for these, some with just the die cuts and some with stamping — all on watercolor paper.
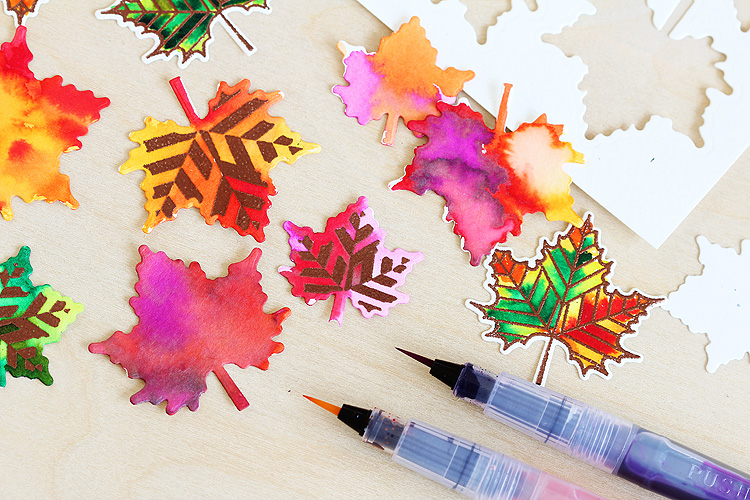
Pretty soon I had a whole pile of leaves on my desk — that’s when I knew that I’d fallen for these markers! I just kept playing with new color combos, mixing in water, and generally having a blast.
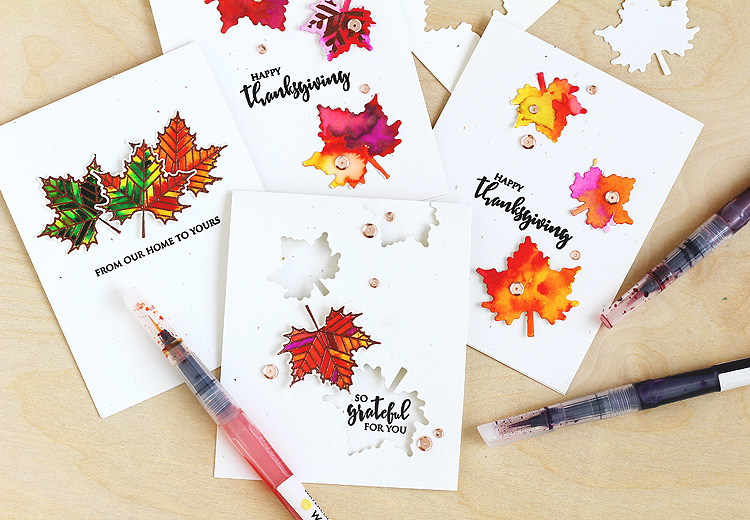
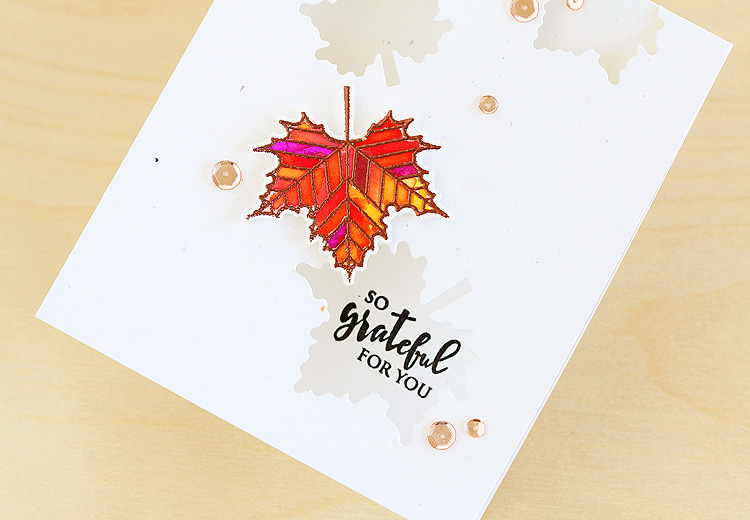
I decided to get a head start on my Thanksgiving cards and used the messages from the With Gratitude to make these simple cards. I just added a few rose gold sequins here and there for a little something.
Here are a few closeups so you can see them better:
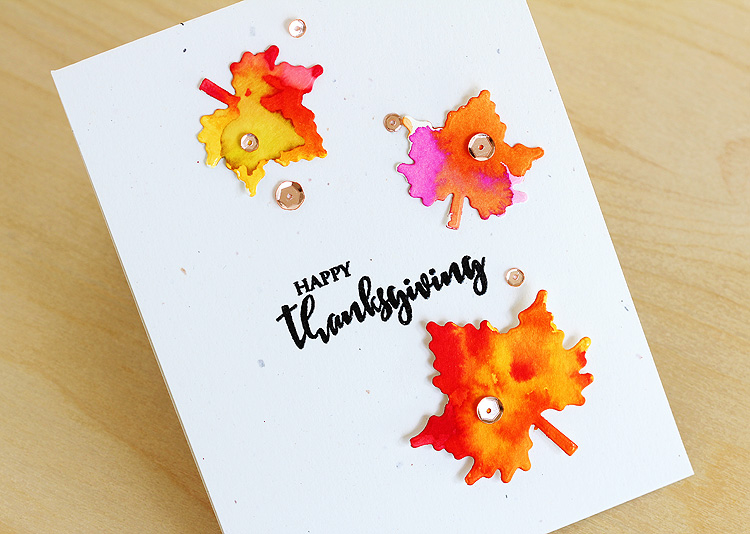
These colors are so vibrant! I especially like the autumn blaze color mixed with warm sunshine and the rubellite and midnight violet.
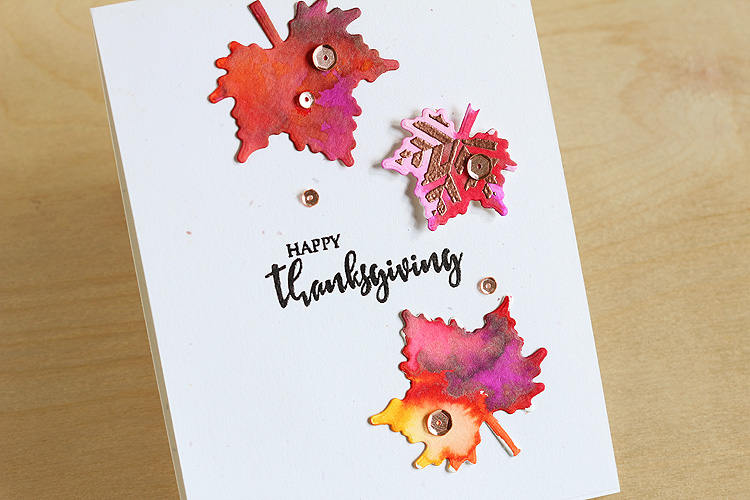
I added puddles of water to these leaves after coloring them to see what would happen — love how it feathered the edges.
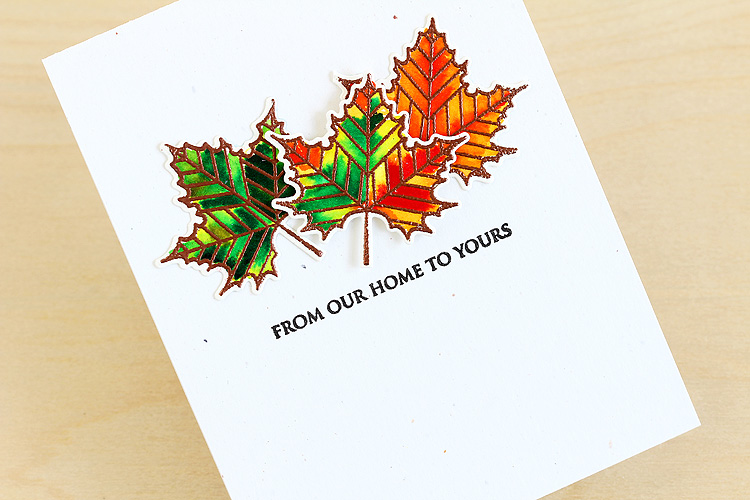
These copper embossed leaves show a progression from green to orange — love that mixed one in the center so I elevated it with foam tape.
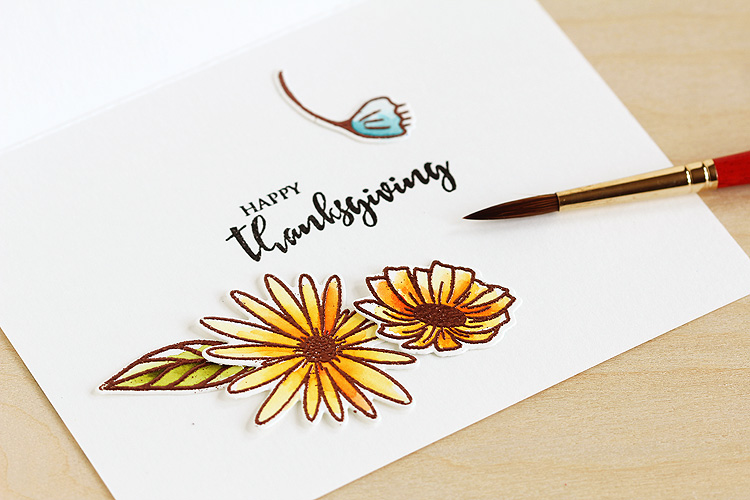
Last but not least, my favorite so far! (Shhhh don’t tell the other leaves…) I happened to glance at the mess on my desk and that gave me the idea to die cut more leaves out of the card base to make windows and then stamp the “so grateful for you” on the inside!
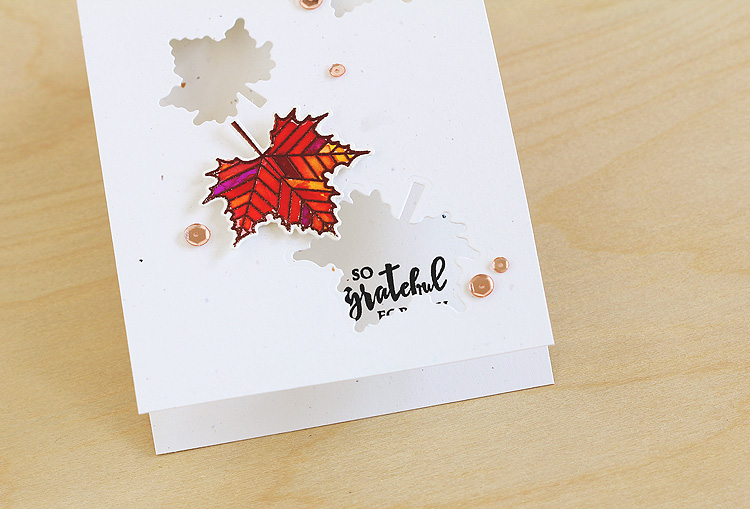
I just love how the colors came out on this one.
Tips and Tricks
- Whenever I get a new art supply I like to sit down and experiment with die cuts like these leaves — it’s a no-pressure way to learn, plus it’s so much fun!
- The biggest surprise was that pale purple color that happens when mixing midnight violet with water — it’s so pretty and unexpected.
- Squeezing the sides of the marker gives you gorgeous, super saturated drops of color — it takes a while to dry but is totally worth the wait.
Now for one last card and a video!
VIDEO: Happy Blooms
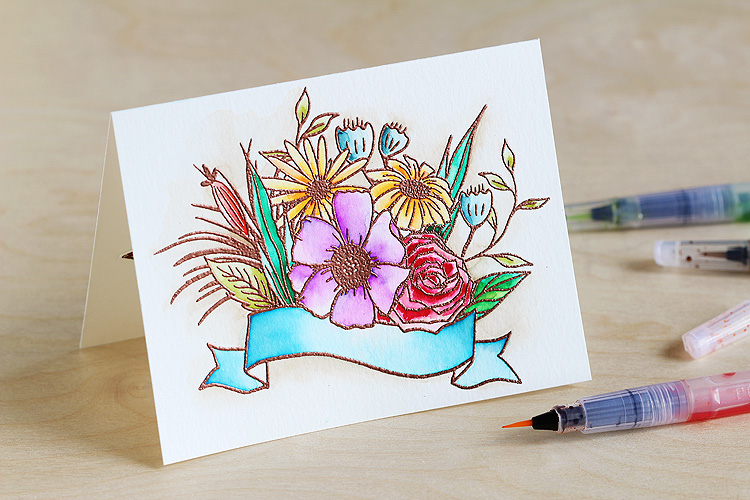
For this last card I just HAD to see how these markers would work for flowers — and I did a little experimenting with the evening gray marker because I was curious how it would blend with the others — turns out that it pretty much goes with everything!
It softens the colors and warms them up, all at the same time. Somehow it went perfectly with this rainy weather that we’re having, too.
Check out this 3 minute video to see:
Here’s a look at the finished card — don’t you just love how the evening gray marker adds the perfect drop shadow effect around the Happy Blooms?
And a closeup so you can see it better:
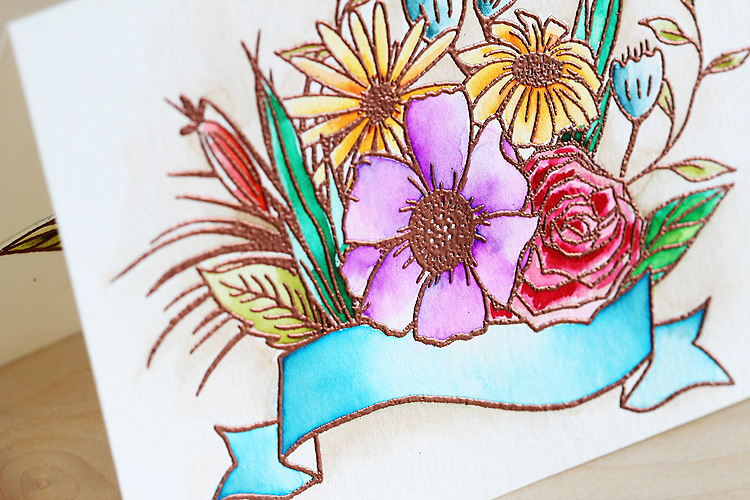
As I mentioned in the video, my original plan was to stamp “from our house to yours” from the With Gratitude set inside the banner — but then I just couldn’t bear to stamp over it! Does that ever happen to you? :)
And here’s a closer look at the inside, where I added some more blooms and cut them with the matching dies. I also wanted to add that you can totally use a waterbrush instead of a regular paintbrush — I just happen to prefer working with a regular brush. (Find out more about the brushes I use in this post.)
Tips and Tricks
- I used ALL 10 markers on this card — I think these colors all work beautifully together!
- I made my base card out of watercolor paper and then stamped the Happy Bloom with embossing ink and embossed it with copper. I think copper is such a great alternative to black, especially for fall.
- When coloring large areas like the banner, first apply color where you’d like it to be the darkest, then use a damp brush to blend the color. Start in the middle of the banner and work your way towards the edges since you’ll pick up color as you work. Rinse your brush out before starting on the other side.
- Scribble marker on scratch paper and then pick it up with a damp brush. I used this technique for the rose since the petals are pretty tiny and the rubellite color is so vibrant and intense that it’s hard to get shading
- Try blending colors together to get new combos. Here I added dusk to the midnight violet in the center flower to switch it up, and I added dusk to the sea breeze on the banner to darken it.
Summary/Wrap Up!
Well we’re almost to the end of the post — thanks so much for reading along with me! I had so much to share and just couldn’t leave anything out. (I actually have 2 more cards coming your way in the future that I didn’t include here haha!!!)
I love how you can get super bright, vibrant colors as well as soft, muted colors — all from this same set of brush markers.
[metaslider id=”15827″]
Since this was sooooooo long I thought I’d share a quick summary for ya:
- Make swatches to try out color combos — I’m keeping mine in the case that the markers come in so that I’ll have it for future reference.
- You can blend the markers with clean water or each other.
- The evening gray marker goes with pretty much everything! Love using it to darken areas and add shadows.
- Some favorite blends are: midnight violet + dusk, sea breeze + dusk, autumn blaze + rubellite and limeade + dusk.
- To get a lighter color, scribble marker on a scratch sheet of paper and then pick up color with a damp brush.
- I noticed that some color got in the lids of the markers — not sure if it’s because I squeezed the handles a bit as I was putting the lids or…? I’ve found that you can use a damp brush to pick the color up straight from the lid tho! I don’t want to waste a drop. I’m going to try and store these vertically to see if that makes a difference — will report back!
- The colors will still react with water several days later. I think this would be great for on-the-go coloring — you can lay down some initial color and then work on it later!
TWO Giveaways!
I have TWO giveaways to share with you! YES!!! Don’t miss out — follow the instructions below to be sure to enter ’em both:
- Altenew is giving away a $40 gift certificate to SIX lucky winners! Please leave a comment on the Altenew Card Blog and/or Altenew Scrapbook Blog by Wednesday, October 10th for a chance to win. Six winners will be announced on the Altenew blogs on October 12th.
I’m giving away a $20 gift card too! To enter, just leave me a comment HERE on this post. I’ll announce the lucky random winner on October 9th.
Cynthia Cole is the lucky random winner, YAY!!! Congratulations, Cynthia!
Hop On!
Your next stop on the hop is Aga’s blog — I can’t wait to see what she’s made — I just know it will rock!!! (Yeah I’ve been a fan of hers for forever!) Here’s the full hop list:
- Altenew Card Blog
- Vicky Papaioannou
- Erum Tasneem
- Lydia Evans
- Keeway Tsao
- Norine Borys
- Kymona Tracey
- Yoonsun Hur
- Rubeena Ianigro
- Laura Bassen
- May Sukyong Park
- Kelly Latevola
- Therese Calvird
- Amy Tan
- Altenew Scrapbook Blog
- Svitlana Shayevich
- Reiko Tsuchida
- Nicole Picadura
- Lisa Spangler <– you are here!
- Agnieszka Malyszek
- Zinia Redo
- Kristina Pokazanieva
- Virginia Lu
- TaeEun Yoo
- Sveta Fotinia
- Lilith Eeckels
Supplies
Note: These are my affiliate links, so if you make a purchase by clicking the link I’ll receive a small commission at no charge to you! [AN] links to the Altenew Shop and [EH] links to Ellen Hutson. Thanks so much for your support!


Happy fall, all!
I love how each card show a different look! These new markers seem amazing! My favorite card is the floral arrangement with the banner. I just love it!
Gorgeous projects! I just love the variety of leaves and the beautiful colors.
[…] Then check out THIS post for another blog hop that I’m in to celebrate the release of the brand new Altenew w… […]
Adorable cards and fabulous colors! Thanks for the inspiration.
What a comprehensive survey of these markers and the colors! I so appreciate you going into so much depth. I’m especially glad to see someone use the Evening Grey marker extensively, because I was having a hard time telling exactly what color/tone it was. Plus, you made gorgeous projects. Your rainbow is stunning; it looks almost holographic in it’s brightness. And I will always love a pile of leaves. Thanks for sharing these projects with us!
The colors are fabulous. Your cards, even greater! I can’t wait to try the brushes.
Wow! Gorgeous colors — love those leaves. Thanks for sharing the great tips, too.
Love the rainbow stripes
Fabulous cards. Love the fall leaves, the flowers and I really like the pinstripe card.
Spectacular inspiration and am loving the fall leaves especially!
Gorgeous cards! I really like the Hello rainbow colored card-love the vibrant colors!
Absolutely fabulous designs Lisa! Love them all! These colors are so vibrant! Thanks for the inspiration!
Absolutely fabulous designs! Love them all Lisa, you did a fantastic job showcasing these vibrant markers! Thanks for the inspiration
All your cards are gorgeous!!!! I can’t wait to get these markers to play with!
I love love love your card with the leaves – this leaf set is going on my wishlist! Love how you used the leaf as a little window!
wow! wonderful eye-candy! I just stared at that wonderful striped card for awhile!!
Wow, amazing watercoloring and stunning cards! Love the blending swatch, so cool to see how the colors play together.
thanks for the tips and tricks.
these pens look like they will be
wonderful to use – make fantastic
cards. txmlhl(at)yahoo(dot)com
Beautiful cards. I love the first one with the diagonal striped — the colors are brilliant. So many possibilities with these new markers!
[…] Winner Announcement Svitlana Shayevich | Winner Announcement Reiko Tsuchida Nicole Picadura Lisa Spangler | Winner Announcement Agnieszka Malyszek Zinia Redo | Winner Announcement Kristina Pokazanieva | […]